


Getting started
First you will need the following stock images and fonts:
Pyramids thanks to jerishoots
Nebula thanks to freelancah
Flare thanks to Official Psds
Font used: Moderna
Next step is to create a new document 800 x 1000, RGB.
Creating the Background
Step 1. Initial Background
Double click on the background layer. Hit Ok. Add a Gradient Overlay layer style with the following options: #565656 to #000000, style Radial.

Step 2. Nebula Background Effect
Load your nebula image. Go to Image -> Adjustments -> Desaturate. Next you should rotate the image 90° CCW. Set the blending mode to Overlay and Opacity to 80%.

Creating the Planets
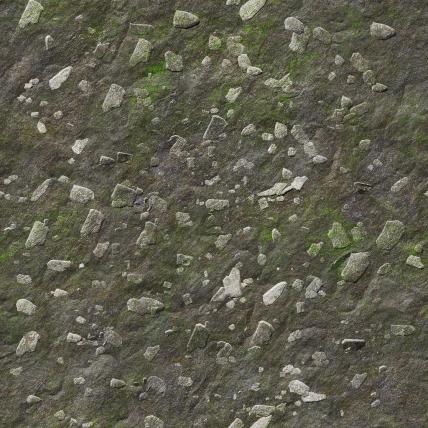
Step 3. Planets
Load in your document the rocky texture. Using the Elliptical Marquee Tool make a selection like shown in the next screenshot.

Keep the texture layer selected and hit Ctrl + Shift + I to invert the selection and press Delete on your keyboard. Press Ctrl + D to deselect everything.

Lets add a little bit of 3D effect to the texture. To do this Ctrl + Click on the textures thumbnail ( this will select it again ) and go to Filter -> Distort -> Spherize…. Use the following options: Amount 100%, mode Normal. Next you should resize your planet a little bit, press Ctrl + T and trasform it after your taste. The result should look like this:

Duplicate the planet layer ( press Ctrl + J to do that ) and hide it until further instructions.
On the original planet layer apply the following layer styles: Outer Glow and Inner Glow

Now let’s move to the duplicated layer. This layer will be the shadow of the planet. Set a Color Overlay style. Use black for the color. Go to Filter -> Blur -> Gaussian Blur and set a radius value of 5.5 px. Move this layer a little bit about 20px to the right and 20 px to the bottom. The result should look something like this:

In this step we’ll erase the surplus of the shadow. To do that Ctrl + Click on the thumbnail of the original planet, and then press Ctrl + Shift + I to invert the selection. In the layers panel select the shadow layer and press Delete.

Reduce the the Opacity of the shadow layer to 90 – 92%. We have successfully created a planet! 

Now select these two layers and group them ( Ctrl + G ). Duplicate the newly created group ( right click on it and select duplicate group ). Press Ctrl + T on the duplicated group and make it smaller. Reduce the opacity of this group to 75 – 80%. Now we have to planets! You can add how many you want.

Step 4. Flare Light
Create a new layer (Ctrl + Shift + N) and fill it with black. Go to Filter -> Render -> Lens Flare and choose the 50-300mm zoom lens. Set the layer blend mode to screen. At this point you should move it and resize it at your will. You can see my result:

Adding the pyramids
Step 5. Pyramid cutout
Load your pyramids image in Photoshop. We will use the Pen Tool to extract the pyramids from the background. Use a big zoom to work more comfortably. Trace a path around the pyramids like shown in the next screenshot:

Using Pen Tool right click in the interior of your path and select Make Selection (Feather Radius: 0 px) . Hit Ctrl + C to copy your selection and paste it ( Ctrl + V ) in your document. Feel free to resize and move it around for a better result.

Step 6. Pyramid Effects
Use the following layer styles on your pyramids layer: Outer Glow and Gradient Overlay ( colors #65346d and #ffcfc9 )

Creating the aurora borealis
Step 7. Creating the shape
Create a new white shape.

Press Shift + Ctrl + X this will bring up the Liquify editor. Press Yes when asked about rasterizing the layer. Using the following values play with your shape until you get something like:


After you finished playing with Liquify apply a Gaussian Blur with a radius of 9 px.

Next we will add a Motion Blur filter. Go to Filter -> Blur -> Motion Blur and use the following values:

Reduce the opacity of this layer to 40%.
Step 8. Adding some colors to our aurora borealis
Apply a Gradient Overlay ( colors: #fbc13b and #f4690e ) style to this layer:

I also added a mask on this layer and with a big soft brush I masked the following areas:

Adding Colors
We will add a Gradient Map. To do this go to Layer -> New adjustment layer -> Gradient map. Make sure this gradient map is on top of every layer and group you have so far. Set the blending mode to Color Dodge. And use these colors: #290a59 and #ff7c00. Leave Reverse unchecked. Add a layer mask and using a black brush remove from the pyramids some of the Gradient Map’s colors. This is how it should look so far (pretty sweet so far) :

Making the Text
Step 9. First Layer
Write your text. As a font I used Moderna with size of 100px. After you finished adding the text we will give some perspective to it. To do this rasterize the the text ( right click on the text layer and select Rasterize Type ). Press Ctrl + T then right click and select Perspective. Play with it for a while until you get to a desirable result. After that duplicate the layer and hide it until further instructions. For the original layer set the blending mode to Overlay and add the following styles: Outer Glow color #ffddda.


Step 10. Second layer
Now lets move to the hidden text layer. First of all set the Fill to 0%. Move the layer a little bit to add the impression of a 3D effect (3 – 5 px up and 3 – 5 px right). Then add the following styles: Stroke ( colors: #ff9c92 and #ffe4e2) and Inner Shadow

So that would be all folks. The tutorial has a sudden ending but I hope that when you will recreate the tutorial you will let your imagination run free. I hope that you enjoyed this tutorial and if you did please share it to the world, we would really appreciate it.

0 commentaires:
Enregistrer un commentaire